Monday, 4 December 2017

Blue Screen Death Of Computer (BSOD) - Causes & Troubleshooting


Blue Screen Death  Of Computer (BSOD) - Causes & Troubleshooting


A, (Blue Screen Death of Computer) (BSOD) technically called a STOP error, occurs when Windows suffers a serious error and is forced to "stop" completely.


BSOD errors can occur in any Windows operating system, including windows  10,Windows 8.1 ,Windows7, Windows vista , Windows Xp , and even Windows 98/95.


Since a blue screen error gives you no choice but to restart, troubleshooting one can be difficult. Fortunately, almost every STOP error includes a hexadecimal-based STOP CODE that can be used to research a fix.


Troubleshoot Blue Screen error (BSOD)


When you experience this type of error, you won't be able to see things like the Start menu or the taskbar on the screen when your PC is turned on. Instead you might see a blue screen with a message that your PC ran into a problem and needs to restart.
 

The most common error you will see codes: 0x0000000A, 0x0000003B, 0x000000EF, 0x00000133, 0x000000D1, 0x1000007E, 0xC000021A, 0x0000007B, 0xC000000F.

When did you see these errors in windows?

  • While upgrading to Windows 10.
  • After an update was installed. 
  • While using my PC.

While upgrading to Windows 10
If you see a stop error while you are upgrading to Windows 10, setup will automatically go back to your previous version of Windows then follow these steps.

  • Update your driver.
  • Scan device performance and health.
  • Run Windows Defender Offline.
  • Remove software.
  • Remove external hardware.
  • Turn fast startup on or off.
  • Start in safe mod.

Update your Drivers
Driver updates for Windows 10 and many devices are downloaded and installed through Windows Update. To update or reinstall drivers

Scan device performance and health
 Windows Defender periodically scans your device for potential problems. To see the results of the most recent scan, type “Windows Defender” on the search bar and select Windows Defender Security Center.

Run Windows Defender Offline
Windows Defender Offline scans your PC for malware.

Remove software
Some software can cause issues during an upgrade. Remove recently installed or unnecessary software.

Remove external hardware
Unplug unnecessary external hardware (printers, webcams, additional monitors, etc.) before upgrading.

Turn fast startup on or off
Sometimes, toggling the fast start-up setting can help resolve stop errors.

Start in safe mode
Safe mode starts Windows in a basic state, with a minimal set of files and drivers.

Error after an update is installed

  • Some stop errors occur after a specific update or driver is installed on your PC. Fixing the error depends on getting to the desktop. 
  • Stop error that lets you get to the desktop. 
  • If you can get to the desktop, try uninstalling the update that's causing the error. You might need to uninstall more than one update if you don't know which one is causing the error. 
  • In the search box on the taskbar, type View installed updates, and then select View installed updates. 
  • Expand the window to see the installation date, and then select the update that you want to uninstall.Select Uninstall. 
 Remove software
  • Remove recently installed or unnecessary software (for example, antivirus software from companies other than Microsoft) and see if that resolves the problem. 
  • Remove external hardware.
  • Unplug unnecessary external hardware (printers, webcams, additional monitors, etc.) before upgrading. 
  • Stop error doesn't let you get to the desktop.  

 Start Windows in safe mode

  • You can also start Windows in safe mode to uninstall recent updates. 
  • If you have used Windows 10 for a while, you might have noticed that the "old ways" of booting into Safe Mode no longer work. By that, we mean trying things like pressing the F8 or the Shift + F8 keys on your keyboard while booting. These methods stopped working because the start procedure became faster than ever before. However, that doesn't mean that Windows 10 has no Safe Mode. It's just that to get to it you have to follow other procedures. Let's take a closer look and see all the ways you can get into Safe Mode in Windows 10.
In Safe mode
  • When in safe mode on your PC, select the Start  button > Settings  > Update & security  > Windows update . 
  •  Depending on the version of Windows 10 that's installed, do one of the following: 
  •  In Windows 10 Version 1709 and later, select Update history > Uninstall updates. 
  • In Windows 10 Version 1609, select Advanced options > View your update history > Uninstall updates.
Start in safe mode
  • Safe mode starts Windows in a basic state, with a minimal set of files and drivers.


Friday, 7 July 2017

How to unsubscribe yourself from Unwanted Emails In Single Shot


Now a days our Inbox is always filled with junk emails which is very frustrating because, Also due to many junks email it's very difficult to find out spam emails which may leads to hacked your account. Most of us have some kind of junk filter, but it's not always effective.

The amount of spam we receive has been increasing each year as Spammers have become more and more creative with ways to sneak emails past your junk filters to try and get you to click on a link, download an attachment, or even worse, a virus.  NOTE: Zimbra scans emails and their attachments for viruses, so none of our users should really be in serious risk of getting a virus in their email.

Thanks to our zeal for email subscriptions. And in this time of heightened civil activity, many of us have added political emails to our already unwieldy collection of daily deals, newsletters, and alerts. The bulk of these messages languish in our inboxes unread and obscuring the really important one that require our action.

Here's how to fight back and keep your inbox clean, regardless of what service you use. There are a few tools to help you prune these offenders without having to scroll message by message through your inbox. Try following of these services to unroll from unwanted unsubscribe.


Unsubscriber is a free to use, On your phone, at work, or at home, Unsubscriber works anywhere you can access your inbox. There’s no new app to download or separate interface to use. It allows you to unsubscribe from senders from right inside your email client, We just need to sign up on their website.


After you sign up the Unsubscriber website with your email account, An Unsubscribe folder is created in your inbox. Drag in unwanted email and Unsubscriber will block email from those senders from entering your inbox. Unsubscriber notifies the sender that you want to unsubscribe from their email list. Until that happens, new emails from that sender will be moved to your Unsubscribe folder.

The process is similar in your mobile device's email app.


Unroll.me

Again, Unroll.me is a free service to use, It instantly see a list of all your subscription emails. Unsubscribe easily from whatever you don’t want.


Just go to the website and sign in there with your Gmail, Yahoo, Outlook account (Any of your email account). Unroll.me then displays a list of all you subscriptions with three options next to each one: Add to Rollup, Unsubscribe, or Keep in Inbox. Click the Unsubscribe button next to each one you no longer want to receive.


Click Add to Rollup option if you keep the subscription to your account. This will add to a daily digest of newsletters to be sent to you each morning, afternoon, or evening. Rollups can be viewed as a list or grid, and you can add or remove subscriptions from them at any time. You can also opt to have Unroll.me notify you monthly of your new subscriptions.


Unlistr

Unlistr is almost similar service offered by Unroll.me, Unlistr automagically finds and unsubscribes unwanted email, It know what can be unsubscribed and how to stop unwanted emails. Don’t worry about Unlistr increasing your junk. It monitor and skips IP addresses blacklisted by the internet community. 


Unlistr works with Gmail, Yahoo, Outlook, Hotmail, AOL, ATT or any other email account that supports IMAP/POP including Exchange.
You can setup as many email accounts as you want with Unlistr. Then, you can scan all of your accounts and unsubscribe in just a few steps. Unlistr can sweep chosen folders and labels such as SPAM or even your old email archive. Also notifies you when emails are ready to be unsubscribed. Simply swipe away in your mobile notifications. Unlistr skips over email senders that you choose to keep. Your unblocked list is then maintained for future reference.
Unlistr is free for iOS and Android but requires a $20 annual subscription for Outlook.


Friday, 16 June 2017

How to speed up your USB Flash Drive and fix slow data transfer issue


Today, USB flash drives (Pen drives) have become omnipresent thing as they're the most suitable way to quickly transfer large amounts of data thanks to their portability. Almost every device has got a USB or Micro USB-on-the-Go port devices like tablets, laptops, TVs and so on, so you can easily plug USB drives into them. If your USB pen drive has a very slow read and write speed and you would like to speed it up slightly, here are a few methods to increase the data transfer speed of your pen drive.


The basic thing you have to know about why this happened
First things, you should have known that USB drives use flash memory which by its nature tends to slow down over time as you use it more. So if your flash drive is very old and has been used heavily, your best option is to get a new one with high speed memory. Second, USB 3.0 drives are much faster than USB 2.0 so you should definitely get at least one USB 3.0 drive to see the speed difference. That said, there is something you can do with your old USB 2.0 drive to make it perform faster.


Format your USB pen drive to NTFS
This will make copy  speed a bit faster. Right click the drive in This PC/Computer folder and select "Format..." from the context menu of the drive. Select NTFS as the file system and untick the "Quick Format" check box


Set USB or Flash Drive Optimized For Better Performance
  • Right click your USB drive once again in This PC/Computer folder and pick "Properties" from the menu


  • In the Properties window, go to the "Hardware" tab: Click the "Properties" button.


  • The Device Properties window will be opened on the screen. On the "General" tab, click the "Change settings" button

  • Under the Policies tab, set the removal policy to the option Better Performance and click on the OK button


Sunday, 30 April 2017

How to Restart or Shut Down PC Remotely


We have a very easy utility in Windows OS Shutdown.exe to restart or shutdown any PC who is in local area network. Well, there are few configurations you need to do to use this utility. Let go into detail

Remote registry service must be enabled on each computer you want to shutdown or restart the PC remotely, generally this service is disabled by default, we need to enable this service which is mandatory for Shutdown.exe utility.


To enable this service type services.msc to Start menu and then hit enter.

After then search for Remote Registry Service and go to properties.


On the properties tab set the service to Automatic and then start the service by clicking on Start tab.

 
Also make it sure that Windows Management Instrumentation(WMI) is allowed on computer firewall and you have admin rights on the remote computer otherwise you cannot proceed with remotely shutdown or restart.


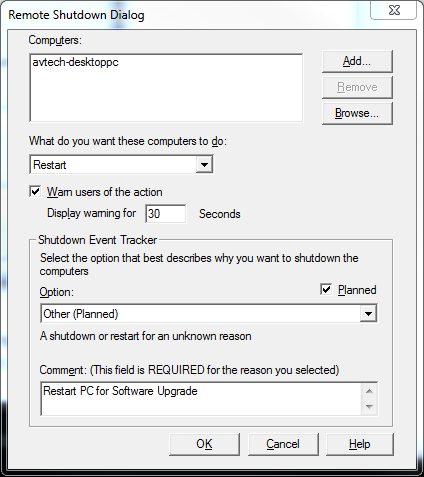
To open the Shutdown.exe utility type shutdown /i command in command prompt


Click on Add button and add the computer name of that computer you want to shutdown or restart the system. We can add multiple computer as well.
After adding a computer name specify whether you want to shutdown or restart.
We can also warn the user by click Warn users of the action option and also record a log on system for restart under Shutdown Event Tracker option.


We can use following command as well to shutdown the pc via remotely.

shutdown /s /m \\avtech-desktoppc /t 30 /c “Shutting down for maintenance.” /d P:1:1

Thursday, 13 April 2017

How to rename Server Name within Active Directory Environment

To rename the Windows Server is always a pain, During rename a server in Active Directory first thing always comes in mind that we need to unjoin the server from Active Directory and rename the computer and then join back Server to Active Directory.

We can use Netdom.exe utility to rename the Server without unjoining to the domain and does not require to reset or manually re-create the Server account in the domain.

We can rename the Server remotely as well, during rename we need to specify the user account that has admin rights in Active Directory.

IF Netdom.exe utility is not installed on you PC, then you can install Windows Server Support Tools from the Support\Tools folder on the Windows OS CD or image.

To rename the Server use following command at a command prompt.


netdom rename computer OldServerName /newname:NewServerName /userd:Domain Name\UserName /passwordd:Password /force /reboot:Time in seconds


Pinpoints of this command

  • Old Server Name:  Name of the current Server
  • New Server Name: Name of the Server will be renamed to, required fully qualified DNS name within Active Directory
  • Domain Name: Active Directory Name.
  • User Name: Required domain account who has administrative permission which will be used to make the connection with the Server to rename. 
  • Password: Password of the domain account which is mentioned in User Name.
  • Time in Seconds: Server need to be restarted after the rename request is completed, so the number of second before automatic restart need to be mentioned over here.                                                                                                                                                           


Map Network Drives Via Command Prompt in Windows


In order to map network drive via command prompt, we use net use command.
To map network drive first we need to know the share path which is also called as UNC path, If you have then use the following command to map shared folder in the name of Movies as E Drive.

net use e: \\Home-PC\Movies

  • Home-PC – It’s a computer name where share folder created
  • Movies – It’s a shared folder name


If a share folder is password protected and to access shared folder you need to enter username password, then use the following command


net use e: \\Home-PC\Movies /user TestUser Password 


  • TestUser – It’s a user name who has access to the shared folder
  • Password – Password of user name who has access to the shared folder


The Drives which you mapped is a temporary one when you reboot your PC the mapped network drives will disappear from your Computer. If you want permanently mapped the network drive on your PC, then use following command.

net use e: \\Home-PC\Movies /P:Yes


To delete mapped network drive use following command
net use e: /Delete


And the last command is to delete all the mapped network drive from your PC.

net use * /Delete

Featured post

Mastering Microsoft Edge: Essential Keyboard Shortcuts