Thursday, 20 August 2020

How to Fix Runtime Error R6025


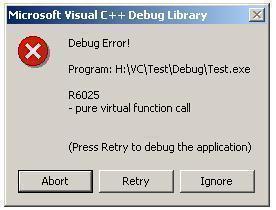
Even though the Microsoft Windows operating system (OS) is one of the most used in the world, computer users may encounter the Runtime Error R6025. The error results from a program or application becoming corrupted. After the error is thrown, the application causing the problem must be deleted and reinstalled in order to clear the error from the Windows OS.

How to Fix Runtime Error R6025

Step 1 – Exit the program that triggered the R6205 runtime error by clicking the “X” in the upper right hand corner or clicking the “File” and “Exit” menu options.

Step 2 – Open the Windows Task Manager by clicking the “Ctrl” + “Alt” + “Delete” keys simultaneously. Choose the “Start Task Manager” menu choice on the subsequently displayed menu.

Step 3 – Click the “Processes” menu tab and choose the “Image Name” menu button.

Step 4 – Verify that the program that threw the Runtime Error R6025 is not listed on the listing of programs. If the application is running, click the name and choose the “End Process” menu button.

Step 5 – Choose the “Start” menu button and click the “Control Panel” menu option. In Windows XP, choose “Settings” and “Control Panel” to access the Windows Control Panel.

Step 6 – Select the “Programs and Features” icon or the “Add/Remove Programs” menu option depending on the version of Windows installed on the computer.

Step 7 – Select the “Remove Program” menu option underneath the application that triggered the Runtime Error R6025 and follow the default menu prompts to delete the program.

Step 8 – Exit the Windows Control Panel then click the “Start” menu.

Step 9 – Enter “Cleanmgr” in the Search text field then press the “Enter” key.

Step 10 – Select the “C” drive and allow the program to clean the files on the computer’s hard drive.

Step 11 – Restart the computer after disk clean-up is complete and reinstall the application that was triggering the R6205 runtime error.
Monday, 10 August 2020

Error Number 0x80072ee2


The Microsoft Corporation has designed the Windows Operating System (OS) to query the Microsoft Update web site on recurring intervals in order to check for and install required updates on your computer. If your computer experiences difficulty in connecting to the Windows Update server, then it can result in throwing error number 0x80072ee2 on your computer and will prevent you from updating the computer until the error clears.

What Other Error Codes Are Associated With the Windows Update Server?

Error 0x80072ee2 is not the only error code that is associated with a failure to connect with the Windows Update server. Other errors that may be associated with your computer failing to connect with the update server are: Error 0x80070008, Error 0x800705B4, Error 0x8007000E, Error 0x80072EFD, Error 0x80072EE7, Error 0x80072EEF, Error 0x80072EFE, Error 0x8024400E, Error 0x80072F76, Error 0x80244016, Error 0x80072F78, Error 0x80244022, Error 0x80090305, Error 0x8024402F, Error 0x8009033F, Error 0xC80003FA, Error 0x80244008, Error 0xC800042D, Error 0x8024400A, Error 0x80071A90, and Error 0x8024400D. The majority of these errors are thrown due to temporary issues that are associated with high network traffic or an outage at the Windows Update Server. Before proceeding with troubleshooting the error, you should wait 15-30 minutes and attempt to start the Windows Update application to check for updates.

Steps to Fix Error Number 0x80072ee2


Step 1 – Wait approximately 30 minutes and attempt to run Windows Live Update again. This will fix the error in the majority of cases that are caused by problems on the Microsoft Server due to high Internet traffic or other server-side problems.

Step 2 – Disable any third-party firewall programs that are installed and running on your computer. Most third-party firewall programs will let you do this by opening the respective control or configuration panel for the application and selecting the appropriate “disable” menu option. You will want to turn on the Windows Firewall (if not running already) to ensure that your computer has some level of protection while your regular firewall is disabled. To turn on the Windows Firewall: select the “Start” and “Control Panel menu options. Then, choose the “System and Security” menu choice followed by clicking the “Windows Firewall” menu option. Toggle the “On/Off” menu switch to the “On” position and enter the admin password for the computer (if prompted).

Step 3 – If the Update Server continues to fail to connect, temporarily disable any third-party antivirus programs that are on you computer. To disable these programs, open the respective control or configuration panel for the program and select the “Disable Virus Protection” or equivalent menu option. Attempt to run Windows Update and the error should be corrected. If this solves the problem, ensure you turn your antivirus protection back to the “On” state to keep your computer protected form computer malware.

Step 4– Add the Windows and Microsoft update sites to the “Trusted Sites” list in Internet Explorer. With Internet Explorer open, choose the “Tools” and “Internet Options” menu choices. Then, select the “Security” menu tab and choose the “Trusted Sites” option. Under “Sites” select the option to clear the “require server verification(https:) for all sites” check box. Then, enter the following sites in the “Add this Web site to the zone box”: update.microsoft.com and windowsupdate.microsoft.com and select the “Ok” button. Then, run the Windows Update application again to correct the error.

Featured post

Top 10 Rare Windows Shortcuts to Supercharge Productivity

  Windows Key + X, U, U: This sequence quickly shuts down your computer. It's a great way to initiate a safe and swift shutdown without...